We all know that going to the field is not as easy as it looks. How would Miguel de Cervantes say: “To be prepared is half the victory”, the same is true in farming, including attaching a three point hitch with the necessary implement for a specific purpose. Snapping can sometimes be simple and fast, and sometimes it’s a living pain. The connection can be snapped in 5 minutes and it can take 35 minutes (I speak from long-term and frustrating experience). It’s quicker and calmer if you do it in pair. If you are new to attaching a three point hitch here is everything you need to know to become a master of attaching implements to your tractor.
What is a three point hitch?
The three point hitch is a hydraulic mechanism that connects a tractor to various implements, allowing for controlled and precise movement of these implements. Named for its three main attachment points also called A-point hitch, it consists of two lower lift arms and an upper link. The lower lift arms are connected to the tractor’s hydraulic system and can be raised or lowered independently, while the upper link provides stability and helps control the implement’s angle of attack.
The primary benefit of the three-point hitch system is to transfer the weight and resistance of an implement to the drive wheels of the tractor. This gives the tractor more usable traction than it would otherwise have, given the same power, weight, and fuel consumption. The 3-point hitch system was patented in the UK by Harry Ferguson in 1926, the Ferguson system revolutionized farming, mounting an implement, rather than towing it enabled tractors to carry a vast array of implements with improved safety, traction, and all-round efficiency.
Three-point quick hitch
Full kit Three-point hitch made of steel
Three point hitch components
Introduction
Through a closer examination of these components, we will unveil the symbiotic relationship between them, igniting a new understanding of how the three-point hitch elevates farming to new heights of productivity and efficiency.
Lower Linkage hitch (lift arms): These robust arms are the primary means of lifting and lowering the implement. They are attached to the tractor’s hydraulic system and are controlled by the operator. The lower lift arms come in various designs, including adjustable arms that allow for fine-tuning of implement height and positioning.
Top Link: The top link, also known as the center link, connects the implement to the tractor’s rear. It is crucial in maintaining the implement’s stability and controlling its depth or angle. Adjustable top links offer flexibility in adapting to different implements and terrain conditions. We differentiate manual screw top links and hydraulic top links.
Stabilizers: Stabilizers, also called sway bars or side arms, are often used to prevent lateral movement of the implement. They improve stability and reduce side-to-side swaying during operation, especially when performing tasks that require precision. They can be connected with a chain, to reduce their unwanted movement to the side that can damage the tire tread.
A-point hitch
Three-point hitch ilustration
Three point hitch category
We know that many different models of tractors differ in weight, height, use, and price…so there are also other categories of three-point hitch for specific tractors. There are several categories that we will explain in detail below.
Categories 0 and 1 belong to garden tractors, compact tractors, and sub-compact tractors and larger tractors will have category 2, 3, or 4 hitches depending on the size or horsepower of the tractor.
Table of Three-point hitch category
Category 0
Category 0 for hitches is almost exclusively found on garden tractors and lawn tractors. Many manufacturers have made tractors with the cat. 0 hitches including Bolens, John Deere, Cub Cadet, Case, Mahindra, Sonalika, and many more. The range of implements is quite extensive including tillers, plows, cultivators, back blades, thatchers, and more. Some implements were specific to the tractor as not all category 0 hitches were standardized and the driven implements had differing methods such as belts/pulleys or driveshafts from a PTO. They are considered light-duty and accept implements that are 20″ wide. Attaching a three point hitch on category 0 is the simplest and quickest way because of simplicity and weight of attachments. The dimension from the lower pins to the top link pin is typically 12″, horsepower is under 20.Some examples of tractor 0 categories :
Category 1 hitches are generally found on subcompact and compact tractors from 20 to 20 horsepower. The top link pin measures 3/4″ in diameter and the lift arm holes are 7/8″. The spacing between the lift arms is approximately 26″ while the mast height is 15″. The mast height is the vertical dimension between the center of the lift arm pins and the center of the hole where the top link goes. Not all category 1 implements will be compatible with all tractors with a cat 1 hitch.
Limited Category 1
Some smaller subcompact tractors have what’s referred to as a Limited Category 1 3-point hitch. Limited cat 1 hitch have the same mounting dimensions as a standard category 1 hitch, but the difference is in the tractor and how much ground clearance and lifting arm travel it has. A tractor with a limited cat 1 hitch may not be able to correctly lift some implements to work properly.
Some examples of tractors with category 1 hitches are :
Starting right around 40 hp the 125 hp tractors are equipped with a category 2 hitch. These 3-points use 1″ top link pins and 1-1/8″ lift arm pins. The lift arm spacing is 32″. Category 2 equipment is built much more heavy-duty than the cat. 1 stuff. There are also many more used pieces for sale typically. Most Category 1 implements can be modified for use on cat.2 either by changing the pins or using bushings to get the right diameter. Some Category 2 hitches have interchangeable balls in the end of the lift arms to accept cat. 1 pins. The basic implements such as back blades, box scrapers, and rakes all are made in Cat. 2 but are typically much larger and heavily built. A lot of agricultural equipment such as liquid sprayers and planters are usually made for category 2 or larger hitches. Some examples of tractors with category 2 hitches are :
John Deere 5 series
Massey Ferguson 4 series
Case Farmall M series
New Holland T6 series
Claas Arion
Category 3
Category 3 hitches are found on tractors of 80 hp to 225 hp and have top link pins that measure 1-1/4″ and lift arm pins of 1=7/16″. The spacing of the lift arms is about 38″. There is also a category 3N hitch which has the same pin diameters but the lift spacing is narrower at 32″. Category 3 tractors are beyond what most homesteaders will have, but if you do be aware of the the difference between the cat. 3 and cat. 3N implements when shopping for one. There are quick hitches available that allow the conversion of a cat. 3 hitch to 3N. The 3N is the same width as category 2 and will also accept those implements when bushings are applied to the pins. Some examples of tractors with category 3 hitches are :
John Deere series 6R
Claas series Celtis Ares, Xerion
Case IH Puma
Massey Ferguson 4 series
New Holland T7 series
This is a quick hitch implement
Category 4
Category 4 hitches are found on tractors of 180 hp or greater and have top link pins that measure 1-3/4″ and lift arm pins of 2″. The spacing of the lift arms is about 46″. There is also a category 4N hitch which has the same pin diameters but the lift spacing is narrower at 38″. Some examples of tractors with 4 category hitches are :
John Deere series 7 and 8 R
Massey Ferguson 8s Series
Case Magnum
New Holland T7
Claas Axion 940
Attaching on a Three-point hitch
Do you have struggles with attaching implements on a three-point hitch (your tractor)? You are in the right place! Attaching can be a “pain in the ass” sometimes, so we will try to teach you how to avoid this situation and to be in the field as soon as possible. The good notice is that that is better to do it in pair if you have someone near call him for help and you will be done within 5 minutes.
Step 1
The first thing you need to do is drive a tractor in reverse at a smaller speed and make sure that your foot is as close as possible to the brake and clutch in order to reduce the chances of sudden movements and damaging implements and tractor. The tractor needs to be exactly in line with the mounting point of the implement, other you will have problems moving the implement by hand from side to side. You’ll notice that one or the other of the lower link arms on the tractor is going to be adjustable up and down. During hitching, you will have to get out of the tractor a couple of times in order to manually arrange the link arms and set them in the correct position.
Step 2
Lower or raise the hydraulic lift arms so that they are level with the lower attachment points on the implement.
Step 3
Now that you are with lower lift arms in line with the attachment and the balls for fastening sit in the pegs of the attachment, get out of the tractor and set the pegs in the balls, and secure them with a splint.If you can’t reach the studs with balls, try loosening the stabilizers(If they are rusted, use WD40)
Step 4
Now that it’s lined up attach the lower link arm on the right side. In goes the linchpin to attach a top link, and the top link just goes along for the ride. Put the part that goes to the tractor in and put a pin through it. Next, adjust the top link so it’s the right length to go back to the hole on the implement. Shorten or extend the upper link, if it is mechanical do it manually(in case it is difficult to extend, lubricate it with WD40) if it is hydraulic, move it with a hydraulic handle. And now we’re all hooked up and you can lift the implement off the ground
Stabilizers
Stabilizers are playing an important part in the stability of implement . They are preventing the implement to not shake and moving on sides. If you don’t do anything with these stabilizers, the implement will be able to flop back and forth.
Some implements can actually get into the tires of the tractor, and that’s bad news. If you fail to adjust these stabilizers to tighten the implement and end up damaging your tires tread , that’s not warrantied. You can do great damage to the back tires .
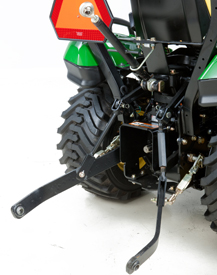
Tractor stabilizers
Attaching PTO to a tractor
When connecting and running your three-point PTO to attachment (sprayer, power harrow, mulcher) there are some safety tips you must be aware of. Here is a list of warnings that will help you stay free from injury.
Wear tight-fitted clothing while connecting and disconnecting your equipment.
Check to make sure all PTO shields and guards are in place.
Disengage the PTO, and shut off the tractor, before connecting or disconnecting your PTO pump.
Do not reach over the back of the tractor to adjust the PTO or throttle.
Never step over a revolving PTO shaft even if shielded.
If the PTO cannot be stretched, lubricate it with tractor grease for better performance
PTO on a tractor
Conclusion
In this article, we have shown everything you need to know about attaching a three-point hitch, attaching PTO for a tractor,three-point hitch categories , and how to attach a three-point hitch. It is known that many farmers sometimes have problems with attaching implements to their tractors. We hope that we helped you and spared your time while attaching a three-point hitch